When it comes to app development, one of the most crucial elements of your app's branding is its logo. It's not just a symbol; it represents the soul of your application and serves as the first impression for users across various platforms. Whether it's displayed in the browser tab, as a mobile home screen icon, or in the app store, your logo needs to look flawless everywhere.
Creating app icons for different platforms—iOS, Android, web, and more—can be a tedious and time-consuming process. The good news is that Icon Genie CLI has come to the rescue, making it easier than ever to generate all the necessary icons and splash screens for your app. Even better, with just a simple tweak, you can skip the trimming process and keep your logo in its original shape and size. Let’s take a look at how you can use Icon Genie CLI to generate your app icons without trimming your image.
The Challenge of App Icons: Why Trimming Isn’t Always Ideal
App icons need to be resized into multiple dimensions to fit the requirements of different devices and platforms. While many icon generation tools automatically trim or crop your logo to fit the required dimensions, this can be a problem if your logo is complex or contains intricate details.
For example, if your logo has a border, a tagline, or other fine details, trimming could unintentionally cut them off. In cases like these, it's often better to use your original logo without trimming—keeping all the details intact.
Icon Genie CLI gives you the flexibility to do just that.
How to Generate App Icons Without Trimming Using Icon Genie CLI
If you want to generate all your app icons and splash screens but skip the trimming step, Icon Genie CLI makes it easy. Here's how to do it:
-
Prepare Your Logo
Start with a high-quality image of your logo, preferably a 1024x1024 PNG file. A larger image ensures better quality and prevents pixelation when resized. Make sure your logo is clear, with no background noise, and fits the app icon requirements. -
Open Your Terminal in Visual Studio
If you're using Visual Studio, open the integrated terminal. You can also use Command Prompt (Windows) or Terminal (macOS/Linux), depending on your operating system. -
Run the Icon Genie Command
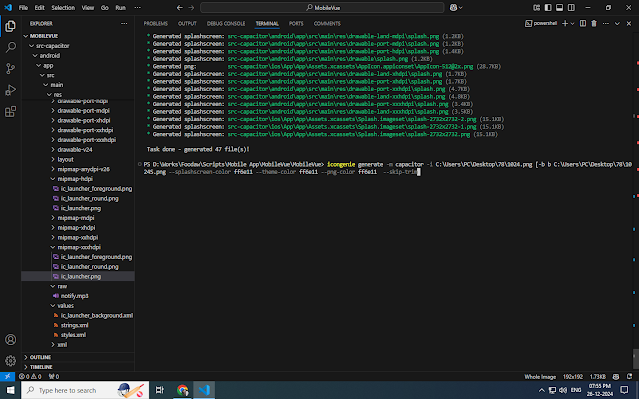
Now that you're ready, use the following command to generate your app icons and splash screens while skipping the trimming step:icongenie generate -m capacitor -i C:\Users\PC\Desktop\78\1024.png --skip-trim -b C:\Users\PC\Desktop\78\1024S.png --splashscreen-color ff6e11 --theme-color ff6e11 --png-color ff6e11Let’s break down this command:
generate: This tells Icon Genie to generate the icons and splash screens.-m capacitor: Specifies that you're generating icons for a Capacitor project (if you’re using a different platform like Cordova, use the corresponding flag).-i C:\Users\PC\Desktop\78\1024.png: This points to the path of your high-resolution logo (1024x1024 PNG).--skip-trim: This important flag tells Icon Genie to skip the trimming process, ensuring that your original logo remains unaltered.-b C:\Users\PC\Desktop\78\1024S.png: Specifies the splash screen image. This image will be used when the app is first launched.--splashscreen-color ff6e11: Sets the background color for your splash screen. Here, it’s set to a vibrant orange (#ff6e11), but you can customize it to match your app's branding.--theme-color ff6e11: This sets the theme color for your app, which affects the browser’s address bar or the status bar on mobile devices.--png-color ff6e11: If you’re using a monochrome logo and want to adjust the color, this flag allows you to specify the desired color for the icons.
-
Wait for Icon Genie to Work Its Magic
Once you run the command, Icon Genie will automatically generate all the required app icons and splash screens, in the correct sizes and formats, without trimming your original logo. All the icons will be placed in the appropriate directories in your project folder, ready to be used in your app. -
Deploy and Enjoy
With the icons and splash screens generated, you can now integrate them into your app. Whether you’re working on iOS, Android, or a Progressive Web App (PWA), Icon Genie has taken care of the hard work, saving you a huge amount of time and effort.
Why Choose Icon Genie CLI?
Managing app icons can be a real headache, especially when dealing with multiple platforms, screen sizes, and image formats. Icon Genie CLI simplifies the entire process by automatically generating the required icons and splash screens in the right sizes and formats. This tool handles the heavy lifting—scaling, naming, and organizing your icons—so you can focus on the bigger picture.
The skip trim feature is a huge plus for developers who want full control over their logo’s appearance. If you have a custom design with specific proportions or details that shouldn’t be cropped, this option ensures your icon remains exactly as you intended.
Final Thoughts
The process of generating app icons doesn’t have to be difficult or time-consuming. With Icon Genie CLI, you can automate the entire process and avoid manual resizing and cropping. By using the --skip-trim flag, you can ensure your logo stays intact, giving you the flexibility to showcase your brand without compromises.
Whether you're working with Capacitor, Cordova, or any other platform, Icon Genie CLI streamlines the process and helps you create pixel-perfect icons and splash screens for all your devices. With just a simple command, you'll have everything you need to take your app’s branding to the next level.
Now, the next time you need to generate app icons or splash screens, remember that Icon Genie CLI is here to make your life easier. Happy coding!

